Chat App using swift xcode
Hi Guys Today We are going to develop Chat Application for iOS using Swift.Tool Here used is Xcode. Let’s start with the building of Chat App for iOS.
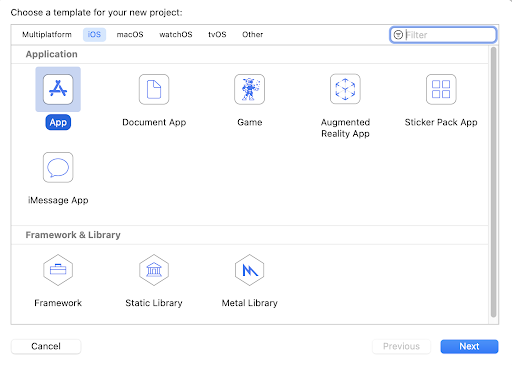
Initially open the Xcode Project Click on single View app as shown in below image
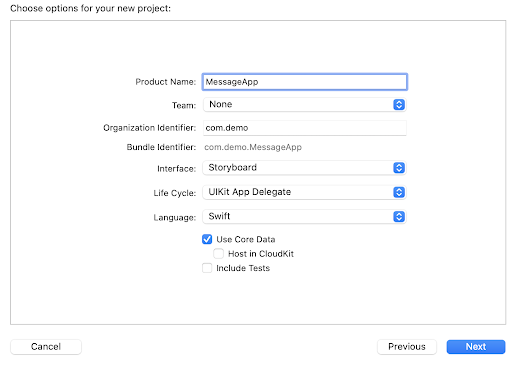
Once you click on the App icon Give the Product Name as you wanted to what will be the name of the app .As i have given the Name as “MessageApp” as shown in below image
Once you give the name of the app Select the interface as Storyboard and keep the lifeCycle as UIKIT App Delegate also choose the language as swift. Organization identifier . I have used as com.demo
Once you are done with all the things you can click on next. As you come on the Xcode main Screen.We need to add the Pod file in the Xcode Project . to import the pod file in the Xcode Project We need to open the terminal.
In the terminal give the command as cd and give the destination project folder As we have the MessageApp.
mymac:~ leadbycode$ cd

mymac:~ leadbycode
nbsp;cd /Users/Desktop/MessageAppOnce your inside the messageApp folder give the Command as follows
mymac:~ MessageApp leadbycode$
give the commond as pod init which create a pod file for the project
mymac:~ MessageApp leadbycodenbsp;pod init
Once you create the Pod file reopen the project folder . open the podfile in the textedit and add the FrameWork as MessageKit in the PodFile
# Uncomment the next line to define a global platform for your project

# platform :ios, '9.0'

workspace 'MessageApp'

target 'MessageApp' do

  # Comment the next line if you don't want to use dynamic frameworks

  use_frameworks!

 pod 'MessageKit'

end
Add the podFile in the project hence save the file.
once the file is saved run the below command in terminal .
mymac:~ MessageApp leadbycode
nbsp;pod install
As the process of the command gets completed open the MessageApp.xcworkspace folder in Xcode
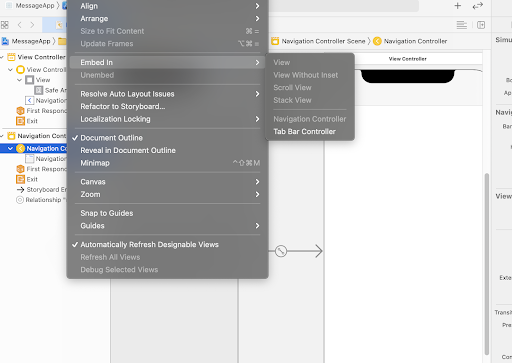
Click on the main.Storyboard . Select the View Controller . Click on the Editor ToolBar. Click on the Embed In .Select the Navigation Controller
class ViewController: UIViewController {


    @IBOutlet weak var myTableView: UITableView!

    override func viewDidLoad() {

        super.viewDidLoad()

        self.myTableView.register(UITableViewCell.self, forCellReuseIdentifier: "cell")

        self.myTableView.delegate = self

        self.myTableView.dataSource = self

        // Do any additional setup after loading the view.

    }


}


extension ViewController : UITableViewDelegate,UITableViewDataSource {


    func tableView(_ tableView: UITableView, numberOfRowsInSection section: Int) -> Int {

        return 1

    }


    func tableView(_ tableView: UITableView, cellForRowAt indexPath: IndexPath) -> UITableViewCell {

        let cell = tableView.dequeueReusableCell(withIdentifier: "cell",for: indexPath)

        cell.textLabel?.text = " Lead By Code"

        return cell

    }

    func tableView(_ tableView: UITableView, didSelectRowAt indexPath: IndexPath) {

        tableView.deselectRow(at: indexPath, animated: true)

    }

}
Now Create a Cocoa Touch Class file as with the name as ChatViewController .add the command import MessageKit in that ViewController .
import UIKit

import MessageKit


class ChatViewController: UIViewController {


    override func viewDidLoad() {

        super.viewDidLoad()


        // Do any additional setup after loading the view.

    }

}
Create a struct of name Sender of type SenderType write the following code
struct Sender: SenderType {

    var senderId: String

    var displayName: String


}
Add the following code to create a Message Struct
struct Message: MessageType {

    var messageId: String

    var sender: SenderType

    var sentDate: Date

    var kind: MessageKind

}
In the Class of ChatViewController create a current user and other user add the following code inside the Controller .
Create a navigation inside the ViewController to the ChatViewController
import UIKit

import MessageKit


struct Sender: SenderType {

    var senderId: String

    var displayName: String

}


struct Message: MessageType {

    var messageId: String

    var sender: SenderType

    var sentDate: Date

    var kind: MessageKind

}


class ChatViewController: MessagesViewController, MessagesDataSource,MessagesLayoutDelegate, MessagesDisplayDelegate {


    let currentUser = Sender(senderId: "self", displayName: "LeadByCode")


    let otherUser =  Sender(senderId: "other", displayName: "iOS")

    var message = [Message]()

    override func viewDidLoad() {

        super.viewDidLoad()

        messagesCollectionView.messagesDataSource = self

        messagesCollectionView.messagesLayoutDelegate = self

        messagesCollectionView.messagesDisplayDelegate = self

        initall()

        // Do any additional setup after loading the view.

    }


    func initall() {

        message.append(Message(messageId: "1", sender: currentUser, sentDate: Date().addingTimeInterval(-86400), kind: .text("Hey Buddy")))

        message.append(Message(messageId: "2", sender: otherUser, sentDate: Date().addingTimeInterval(-76400), kind: .text("Hi bro ")))

        message.append(Message(messageId: "3", sender: currentUser, sentDate: Date().addingTimeInterval(-66400), kind: .text("How is work going on ")))

        message.append(Message(messageId: "4", sender: otherUser, sentDate: Date().addingTimeInterval(-56400), kind: .text("good how about u")))

        message.append(Message(messageId: "5", sender: currentUser, sentDate: Date().addingTimeInterval(-46400), kind: .text("great lets catch up")))

        message.append(Message(messageId: "6", sender: otherUser, sentDate: Date().addingTimeInterval(-36400), kind: .text("yup when")))

        message.append(Message(messageId: "7", sender: currentUser, sentDate: Date().addingTimeInterval(-26400), kind: .text("evening")))

        message.append(Message(messageId: "8", sender: otherUser, sentDate: Date().addingTimeInterval(-16400), kind: .text("noop buddy ")))

        message.append(Message(messageId: "9", sender: currentUser, sentDate: Date().addingTimeInterval(-6400), kind: .text("why ")))


    }

}

extension ChatViewController {

    func currentSender() -> SenderType {

        return currentUser

    }


    func messageForItem(at indexPath: IndexPath, in messagesCollectionView: MessagesCollectionView) -> MessageType {

        return message[indexPath.section]

    }


    func numberOfSections(in messagesCollectionView: MessagesCollectionView) -> Int {

        return message.count

    }


}
Add the Following code inside the ViewController
class ViewController: UIViewController {


    @IBOutlet weak var myTableView: UITableView!

    override func viewDidLoad() {

        super.viewDidLoad()

        self.myTableView.register(UITableViewCell.self, forCellReuseIdentifier: "cell")

        self.myTableView.delegate = self

        self.myTableView.dataSource = self

        // Do any additional setup after loading the view.

    }


}


extension ViewController : UITableViewDelegate,UITableViewDataSource {

    func tableView(_ tableView: UITableView, numberOfRowsInSection section: Int) -> Int {

        return 1

    }


    func tableView(_ tableView: UITableView, cellForRowAt indexPath: IndexPath) -> UITableViewCell {

        let cell = tableView.dequeueReusableCell(withIdentifier: "cell",for: indexPath)

        cell.textLabel?.text = " iOS Dev"

        cell.accessoryType = .detailDisclosureButton

        return cell

    }

    func tableView(_ tableView: UITableView, didSelectRowAt indexPath: IndexPath) {

        tableView.deselectRow(at: indexPath, animated: true)

        let vc = ChatViewController()

        vc.title = "message"

        navigationController?.pushViewController(vc, animated: true)

    }

}
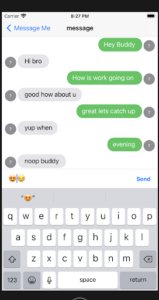
Run the Code See the output of the Chat App

